The Octo Mic Shootout!
1 performance, 4 mic positions, 8 microphones!
Recording Didgeridoo: Workshop
Recently I had the pleasure of being a teacher at the Didgeridoo Camp in Spolek Hvozd, together with Lies Beijerinck (Didgemama) and Lukas and Eva Pilnaj. My focus was in getting people up to speed with monitoring and recording setups. I have detailed why I think this is so important in my article Didgeridoo Learning Philosophy For Your Pleasure And Growth, so much so that I work to share the necessary skills and start more didgeridoo players on their journey to joy.
Microphone Shootout Setup
As part of my teaching, I tend to stress the difference a choice of microphone can make, as well as the difference a choice of position relative to the instrument can make. So in this post-lunch, pre-afternoon session recording, I set up 8 microphones along the path of optimal direct sound capture at 4 distances, two each.
This is the setup I chose:
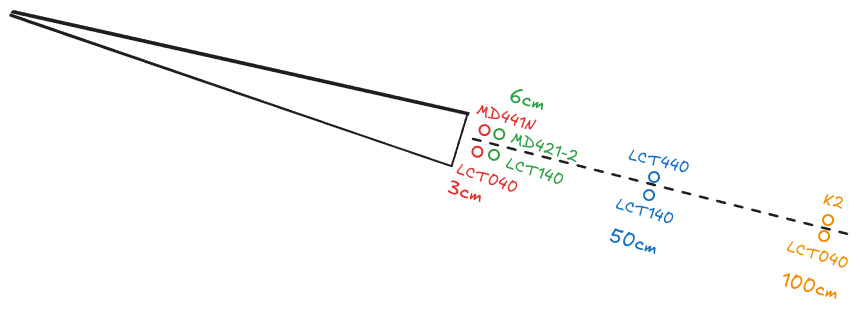
display of the mic shootout setup. At increasing distances, microphones are placed and recorded in unison on multitrack.
For one “lane”, I used the LEWITT small condensers, a pair of LCT040 and a pair of LCT140, both matched respectively. I spread those out over the four distances, taking care to set up their switches so they’d sound alike the most. While I have become aware that these two small diaphragm condensers are not sharing the identical capsule, their frequency response is quite similar (if “AIR” is engaged in the LCT140) even though the LCT040 is more sensitive. (I’m still meditating on how that gives them both the same noise, dynamic range and max SPL figures, by the way!) Blue on the graph is 140 AIR, green 140 FLAT, orange is 040.
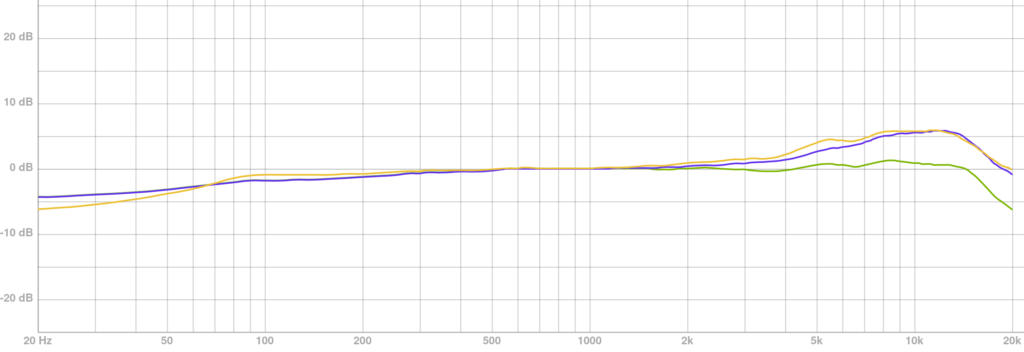
Lewitt 140 AIR, 140 FLAT, 040 frequency response chart, manually combined.
Along the lane, we will have a decreasing proximity effect with increasing distance. At 1m, we can assume the sound to be whatever-reference-neutral. Plan was to take 100 50 25 12 6 3 cm, but it gets crowded so quickly. Maybe I try another time with a whole bunch of LCT040s (oy, Lewitt, do you mind sending me a bucket full?) because they take the least space. But they clip.. oh well. The idea of looking at this axis with same(-ish) mics just having different distances and hearing how also air is acting as a HF compressor, signal balance, …
The other “lane” has seen me put one of my different go to mics for different situations at the same distances as the LEWITT small condensers. There, I placed a Sennheiser MD441N, a MD421N, a LEWITT LCT440 and a RODE K2.
Here, we can look, at each place along the same-ish lane to experience one different sensation at the same distance. At the short spots, we’re talking about cheap modern small diaphragm condenser mics vs. battleship era dynamic mics. At the bigger distances, I placed two large diaphragm condensers against the small diaphragms on the 040/140 lane. The 440, carrying the same “fingerprint” of the company as compared to the SDC lane can show what going to a large diaphragm condenser can do for you, and the K2 at the bigger distance is capturing another shape of sound, once more.
Mic Shootout At YouTube
During the afternoon session, this allowed me to show the differences between mic sound at four positions, A/B’ing the mics at the same distances; as well as showing the proximity effect with A/B’ing the “same” (matched pair) mics along the “LEWITT SMALL CONDENSER AXIS”. You can head over to YouTube to find my video there: DidgeCamp 2024 Mic Model and Position Comparison.

What about these values?
For each source, I display a set of values. Let’s look at a screenshot from the video:
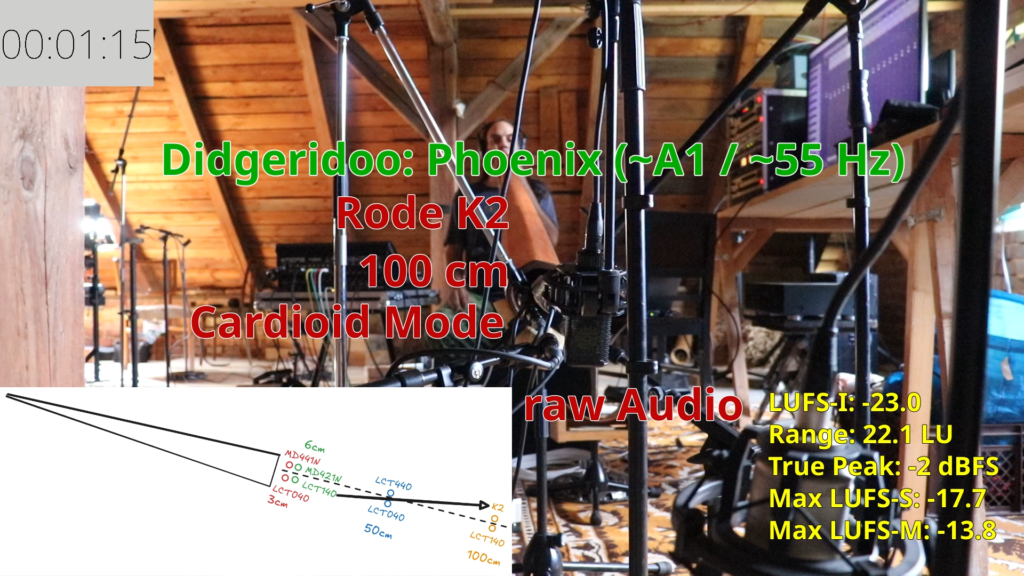
There’s these strange values again!
So on the very top left corner, you can see a countdown timer to give you orientation in the nine repetitions of the solo. In the top, you can see the didgeridoo I recorded this with, shoutout to Lukas Pilnaj! This is the Rode K2 microphone, placed 1 meter from the bellend. The microphone is set to cardioid mode (it’s a multi-pattern tube microphone, so that’s the pattern that was chosen). The “raw Audio” refers to it not being mixed – equalized – compressed – treated … none of that. So you’re just listening to the microphone. For fairness of comparison, I level matched the various recordings. Now if you know your stuff, you’ll be asking whether it was peak matched or loudness matched, and the values in yellow will answer this question. If you don’t know your stuff: it’s been peak matched, True Peak normalized to -2 dBFS. That’s the third line. The first line talks about the “integrated loudness”, which means it assigns a value to the loudness of the whole piece. The higher this value, the louder is the piece. The same is true for “Max LUFS-S” and “Max LUFS-M”, which means the maximum loudness value for a sort of short sliding window (LUFS-S) and a decently short gliding window (LUFS-M). Finally, the “Range” here refers to the dynamic range. The higher this value, the higher the difference between the softest and the loudest sections of the piece.
Why show those values?
These values allow you to understand, e.g., the camera compression. Compare the much lower dynamic range of the camera audio to all the other recorded audio. Given the ceiling of the recording is the same for all, the difference in dynamic range comes from the ability of the source to capture soft sounds as well. So the higher the range, the better the microphone will cover the span between soft and loud. The Camera audio thwarts this perspective by compressing the dynamic range. You can hear the difference in the soft playing.
Things to listen out for
Well, first of all, answer yourself the question: which of the positions / microphone choices to you like best? Try to listen to each recording fresh after you’ve probably listened to the whole song on loop for nine times, it’s time to use the YouTube Chapter links to jump directly to a mic you want to listen to. Use the countdown clock in the top left of the video together with the transport controls in YouTube to hop to the places you’re interested in.
- If you had to pick one pair of mics that you’d like to blend to get intimacy and bass energy (yay! proximity effect!) and “roominess”, which pair would it be?
- If you manage to get over the obvious bass differences in positions, which position do you like best for its natural balance?
- If you were to choose from the Lewitt SDC lane, and the other one, which are your preferences?
- Which of the mics do you think most closely resembles the actual dynamic energy difference in the most realistic way?
- Can you hear distortion or something weird in any of the recordings?
- How much background noise can you hear on the mics?
Strategies to use for listening
- identify a section that you like and compare it across the various recordings
- fix a position, and A/B between the two mics in this position
- fix on a model and A/B (or A/B/C/D) between the mics in the various positions
Keep in mind that whichever thing you listen to first, that’s gonna be your norm. In a sense it’s been a bad idea to include the camera audio first and then immediately jump to it being close mic’d. I probably should’ve chosen the other direction.. but it is what it is. The difference between the camera audio and listening to the first LCT040 is massive, and the mic audio may seem excessively dull and dark. But really, listen to it a few times on repeat and then that’s gonna be your norm. Give each position, and each mic, a proper chance by focusing on it as its own thing, and not as the difference to the previous or next position.
That being said, do also compare, and see the thing by looking at the differences to another thing.
Go forwards, go backwards. Explore. This is my gift to you.
Why not more …
…microphones and positions? Well, these eight mics were picked to span a range of small, large condensers, dynamics, close micing, far micing, and you can learn a lot already. Why is your favorite mic not up there? I might not have it? Or I just ran out of space.
I would have loved to add more distances, but in the end the physical arrangement gets quite challenging, especially given the optimal spots are limited. So check out the patreon for more and future mic shootouts and analysis!
Shootout Analysis And More at Patreon
In practice during the sessions, there’s limited time though, so I can hardly go over a comprehensive dive into the various positions and microphone choices along that placement trajectory. This is where my Patreon comes into play. When you’re done enjoying my playing of an ad-hoc test-song to cover some different applications of didgeridoo recording, you might want to support me in documenting the potential of various microphones, mic techniques and positions for various didgeridoo keys, playing techniques and general application.
Recent Comments